Overview
With a network license, you can use the software on several computers on a network.
Note: The number of computers that can use the software simultaneously depends on the number of “seats” purchased with the network license.

The system installation is composed of 2 steps:
• On the server/computer hosting the network key: Installation and configuration of the computer/server hosting the network key.
• On the computers that will run the software: What to install on the computers running the software.
You will need
• Your Network protection key:
– USB protection key (red or white dongle)

• The software installation files:
– Download MOUNTAINS.ZIP from: digitalsurf.com/support/software-updates/ *
– Unzip them on the hard disk drive, a USB key, or a CD.

• Your Product installation code (6 digits) *
• An up-to-date Internet browser (Chrome, Firefox, Internet Explorer) to access the Sentinel Admin Control Center to configure the USB protection key.
• Administrator rights on the server and the computers
* LogIn, Password and Installation code can be found in the email you received. If in doubt, please contact your distributor.
Technical requirements
- The Firewall on the computer/server hosting the protection key must allow incoming TCP connections on port 1947 and UDP connections on port 475 only if “Hasp Loader” installation is required on the computer/server hosting the network protection key (see below the server installation steps). Configure your Firewall accordingly.
- If your protection key is hosted on a server:
The “Sentinel License Manager” is compatible with network protocol TCP/IP for Microsoft servers 2012 R2, 2016, 2019, 2022, Win 10 IoT Entreprise 2019 LTSC, Win 10 Version 21H2 and Windows 11. - The computers running the software must be part of the same network as the computer/server hosting the network protection key.
- For system requirements for installing the software, see Technical Specifications.
Installation and configuration of the computer/server hosting the network key
1. Install the HASP drivers for the USB protection key.
Note: Installing the drivers will also install the “Sentinel Admin Control Center”, for configuration.
Note: These drivers or services may also be called “Sentinel LDK License Manager”, or “RTE (Run-time environment)”, “Run-time installer”.
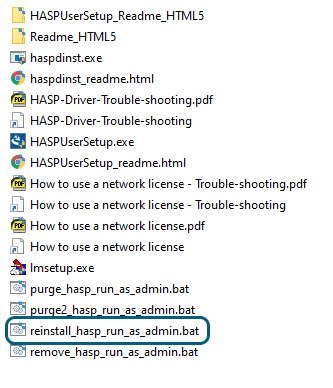
To install, re-install or update the drivers, go to the folder with the software installation files > Hasp folder.
Right-click and run (as administrator): reinstall_hasp_run_as_admin.bat
Note: The file haspdinst.exe must be present, in the same folder.
2. Plug the USB protection key (network dongle) into a free USB port on your computer.
Wait for a moment, until the red light inside the protection key turns on to indicate that it is working correctly.
3. Enter http://localhost:1947/_int_/devices.html in your Internet browser.
-> The Sentinel Admin Control Center is displayed. The list of all available licenses is displayed.
Find your protection key.
Tip: Verify if the label “driverless” is mentioned:
![]()
If yes, you can skip the next step (step 4).
4. Install the “HASP License Manager” as a service (“Hasp Loader”), using the file “lmsetup.exe”
- Right-click and run (as administrator) “lmsetup.exe”, to install the “HASP License Manager”. Choose a language for the installation. Several dialogs guide you through the installation process:
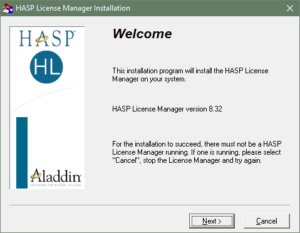
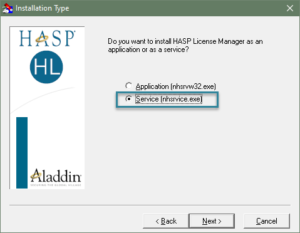
- When asked if you want to install the “HASP License Manager” as an application or as a service, choose “Service”:
- Follow the steps until the final installation.
Note: Once installed, this service is called “Hasp Loader“.
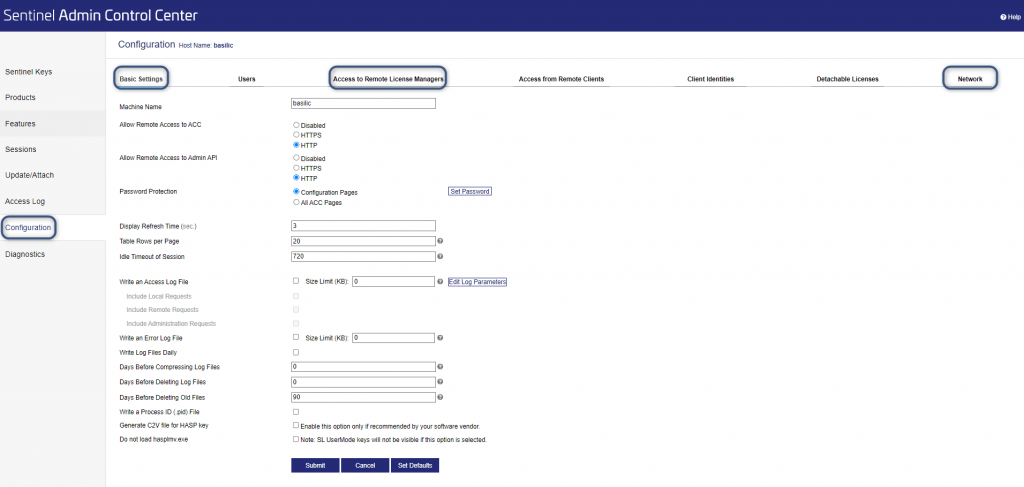
5. Enter http://localhost:1947/_int_/config.html in your Internet browser.
-> The “Sentinel Admin Control Center” is displayed.
In the “Configuration” menu, we will use the following tabs:

6. Configuration > “Basic Settings” tab
A password must be set. Click on “Set Password”.

The following dialog opens:
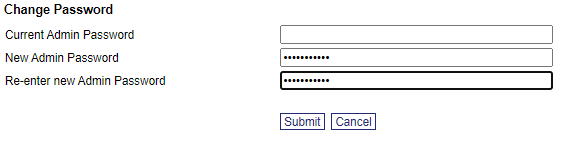
Define a password and click on “Submit”. Keep this password in a safe place, it will be needed each time you want to access http://localhost:1947/. When this password is required, the login should stay empty.
Activate the options:
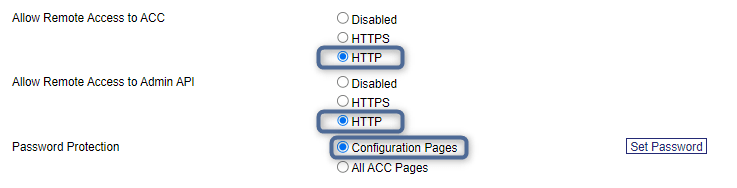
Click on “Submit”.
7. Configuration > “Access from Remote Clients” tab
Activate the option:

Click on “Submit”.
8. Configuration> “Network” tab
Choose the option:
![]()
Then click on “Submit”.
Installation and configuration of the computers running the software
Install the software on the computers on the network on which you wish to use the software.
Note:
1. You can also install and use the software on the computer used as a server.
2. The number of computers that can run the software simultaneously depends on the number of “seats” purchased with your network license.
For information about installation, see Mountains® installation guide
1. Enter http://localhost:1947/_int_/config.html in your Internet browser.
-> The Sentinel Admin Control Center is displayed.
In the “Configuration” menu, we will use the following tabs:
2. Configuration > “Basic Settings” tab
A password must be set. Click on “Set Password”.
The following dialog opens:
Define a password and click on “Submit”. Keep this password in a safe place, it will be needed each time you want to access http://localhost:1947/. When this password is required, the login should stay empty.
Activate the options:
Click on “Submit”.
3. Configuration > “Access to Remote License Managers” tab
Choose the option “Allow Access to Remote Licenses”
In “Remote License Search Parameters”, you need to enter the network name or the IP address of the computer/server hosting the network protection key.
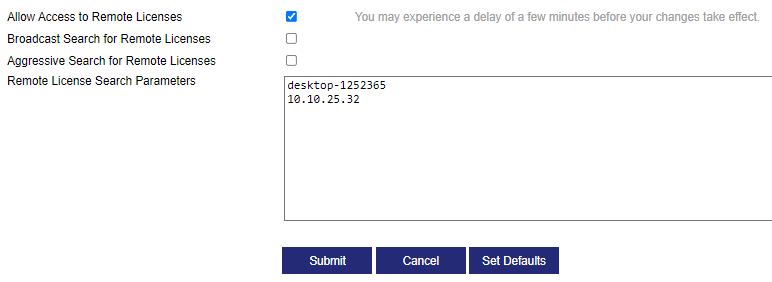
Click on “Submit”.
4. Configuration > “Network” tab
Choose the option:
![]()
Then click on “Submit”.
Starting the software
When you start the software on a computer which is part of a network equipped with a network protection key, the following dialog may be displayed:
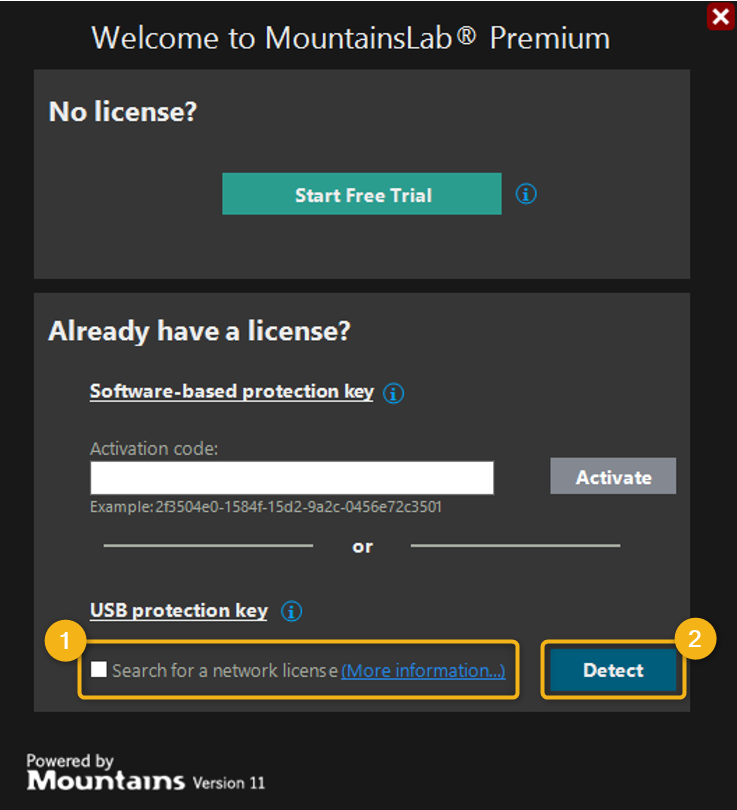
1. Activate the option “Search for a network license”
2. Click on [Detect]
• If there are no more “seats” available (i.e. if more software sessions are open than purchased network seats), a message tells you so.
Close at least one of the sessions and try again.
• If several licenses have been detected, the following dialog invites you to choose which one you would like to use:
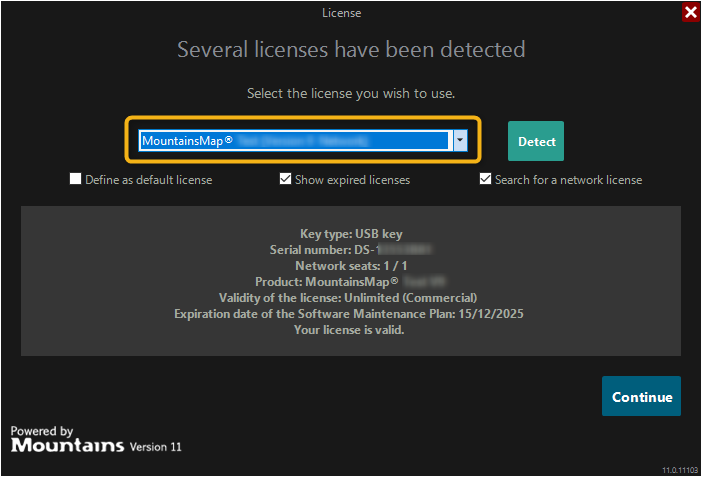
Choose the license that you would like to use in the list. If your license is not listed :
1- Activate the option “Search for a network license”
2- Click on [Detect license].
Basic trouble-shooting (The software cannot be launched, no license is found…)
1. Make sure that the computer/server hosting the protection key is switched on.
2. Make sure that the protection key is working (a red light on the key indicates that it is recognized and working).
3. Make sure that you have access to the Sentinel Admin Control Center:
Enter http://localhost:1947 in your Internet browser.
If there is a problem, re-install the drivers. Advanced information…
Advanced trouble-shooting
If you still have problems:
- Verify if the services related to the protection key are running: “Sentinel LDK License Manager (hsplms)”and “Hasp Loader”.
- Verify the configuration of your Firewall.
To know how to do this, please refer to the “Advanced trouble-shooting” section in our complete guide “Trouble-shooting in case of network license problems“.
Note: It might be a good idea to get help from your IT manager.