Many manufacturers in the mechanical industry face the challenge of verifying the surface finish of the parts they produce. Researchers working on new materials or processes often face a similar problem and don’t always know how to assess surface texture properties. A lack of knowledge or resources can easily lead to poor choices regarding the instrument, measurement protocol or analysis. And these mistakes can cost time, money and potentially compromise quality. So, should you measure a profile or a surface? Should you use a contact profilometer or an optical profiler?
In this article François Blateyron, Digital Surf’s senior surface metrology expert, offers practical advice and outlines good measurement practices.

Verifying a specification
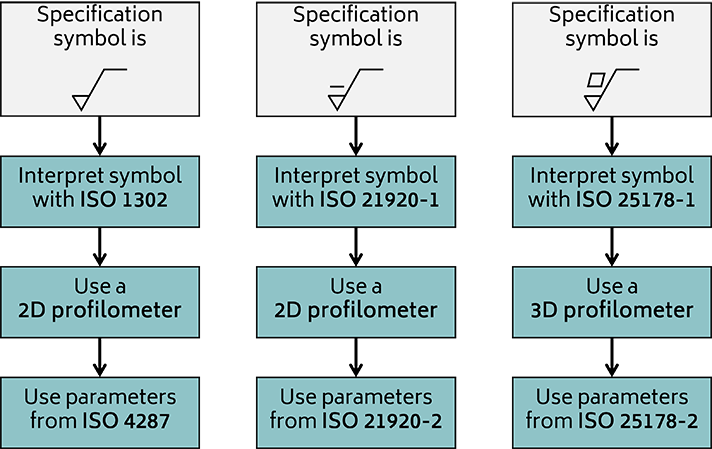
Are you verifying a tolerance on a technical drawing or exploring a new material? The answer determines the right measurement and analysis method. If you need to check a specification provided on a drawing, the goal is simple: just follow the specification. However, interpreting the root symbol, identifying default parameters and choosing the instrument configuration can be more complex.
Further reading:
- Guide to ISO 1302 surface finish symbols
- Video: How to interpret surface finish symbols
- Default specifications guide

Exploring a new surface
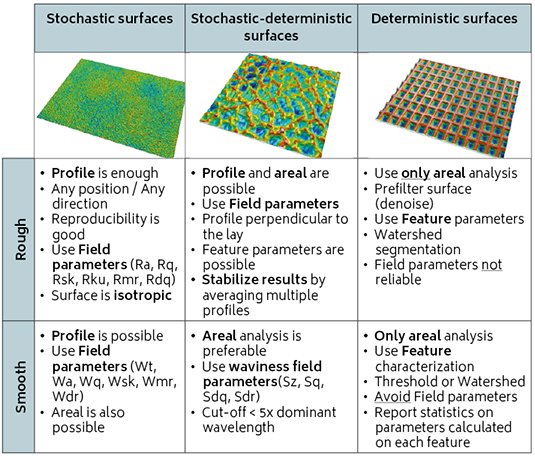
When investigating new materials or surface treatments, the first decision is what type of measurement to use. Modern engineered surfaces are often structured or textured to achieve specific functions such as improving adhesion, reducing friction or enhancing hydrophobicity. In these cases, the choice between profile and areal measurements depends on the surface’s complexity.
Surfaces can be classified along a continuum from stochastic (random, isotropic) to deterministic (structured, anisotropic). Stochastic surfaces behave the same in all directions, so a single profile may represent the whole surface adequately. Deterministic surfaces, however, include repeating patterns or directional features. These require areal measurements to properly capture texture directionality, periodicity or local variations.
Further reading:

Choosing the right instrument
2D contact profilometers are still widely used: they are simple, affordable and reliable for metallic parts. However, they may not be suitable for fragile, brittle or soft materials, as contact can cause damage to the sample, or to the stylus itself.
Non-contact instruments such as optical profilers or those featuring single point probes with a lateral scanning system are often better suited for sensitive surfaces.
Areal optical profilers can handle most surface types but typically have a limited field of view, requiring stitching for large areas. Instruments using lateral scanning (profile or areal) can cover wider parts but may suffer from straightness or flatness errors.
Understanding the metrological performance of your instrument and maintaining regular calibration routines are essential for reliable results.
Further reading:
Choosing the right analysis
Surface texture analysis is not just about calculating Ra. The choice of parameters (amplitude, spacing, hybrid or feature-based) depends on the function of the surface. Correct filtering is equally important.
When verifying specifications, follow the defined parameters and default settings. When exploring new surfaces, choose analysis methods consistent with the surface’s structure and complexity. Always report the analysis conditions, especially the filtering used.
Further reading:

Conclusion
Accurate surface texture analysis requires both technical insight and metrological rigor.
Before measuring, always define your objective: are you verifying a specification or exploring a new material? Choose the right instrument and parameters, note the measurement conditions, and interpret results in the context of the surface’s function.
Ultimately, understanding a surface means understanding the process that created it, or the factors that changed it.
Author : François Blateyron