Scanning Electron Microscope (SEM) images are black and white by nature, as SEM microscopes usually generate only one intensity value per pixel under the electron beam, whereas microscopes based on photons usually pick up color as well.
However, colorized SEM images are a common practice in many fields since color allows for easier object identification and differentiation.
Colorized images are also highly appreciated given their possibility to accentuate particular elements in a visual. These are particularly sought out for publications since they can bring more meaning to illustrations.
SEM images are used across a broad scope of application areas, ranging from industrial to medical, forensic, archaeology, semi-conductor, geology and materials science.
In this article, we explain how to colorize SEM images in just a few clicks using MountainsSEM®.
Colorizing SEM images with MountainsSEM®
The image colorization tool
The colorization tool in Mountains® is quick and easy to use thanks to powerful proprietary dedicated SEM-SE image segmentation algorithms. This automatic object recognition by the software makes adding color to SEM images a fast and straightforward process, unlike when using non-dedicated photo editing software.
To use this tool, start by loading your SEM image via the File tab, situated in the upper left-hand corner of the interface, and use Load a studiable. If you can’t find your image, remember to select all formats. Alternatively, just drag-and-drop your image into the software interface.
Once it’s loaded, head to the Studies tab of the interface. Clicking on Image colorization will produce a new frame in the document. A colorization panel containing the different tools and display options will appear.

The MountainsSEM® colorization tool.
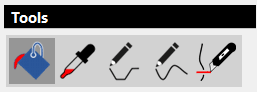
To start colorizing, simply select the paint bucket tool and pick a color from the color palette. You can replicate a previously used color using the eyedropper tool.
Then, select the elements in your image that you wish to apply your chosen color to. Use the eraser tool found under the color palette to delete any undesired colors.
Applying color to objects in an image in a single click.
Tip: Use the MountainsSEM® auto-colorization tool to save time. If your image contains a repetition of similar elements you wish to colorize, you can assign colors to one element and let the software colorize the remaining ones. This tool is found in the section Rest of the image of the colorization panel.
The MountainsSEM® auto-colorization tool.
The Auto-colorization feature can be based on:
- The shape of the elements
- Detect and colorize elements with different shapes in the image. However, if the elements are similarly shaped, the size feature is usually a better option.
- The size of the elements
- Useful when the categories differentiate by the size of the object (think an assortment of “cherries” and “oranges”)
- To highlight a particular element
- The uniform color feature allows you to quickly colorize the rest of the image (usually the background) while excluding the elements you wish to accentuate.
In the case of the above image, the auto-colorization from shape was applied.
Segmentation with MountainsSEM®
MountainsSEM® automatically detects the borders of the elements in an image to allow colorization. If you’d like to further personalize this selection, there’s a variety of different tools available.
You can (1) apply general settings such as noise filters to globally enhance the segmentation, and then (2), manually and locally edit each border between objects:
(1) The Segmentation tool at the top of your colorization panel will allow you to quickly fine-tune your border selection by applying a variety of preliminary filters that will smooth out details according to size by excluding zones or by deleting non-desired motifs, depending on the importance of the details.
Tip: Select the Apply in real time option to see the changes before they are applied to the image.
(2) The Add borders and Cut borders tools give you complete control to add or delete your segmentation borders. New borders can be drawn with or without assistance (free path or path matching the contours of smaller not-yet segmented details).
Add or delete image borders manually using the tools provided.
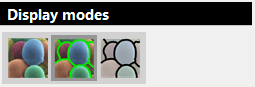
Tip: Switch between the three different display modes available to edit and check back your work:
When you are happy with the results, you can save your work or export your colorized image.
Would you like to learn more about MountainsSEM®?
MountainsSEM® for Scanning Electron Microscopy