In recent years 3D printing has taken the world by storm and with the latest advances this technology is becoming more and more accessible to the general public. As far as the world of microscopy is concerned, there are many benefits of using 3D printing to produce scaled-up replicas of samples.
Two-dimensional (2D) images can often prove insufficient for detailed analysis of organization and morphology of micro-structures.
However, being able to generate a highly accurate, solid scale replica of the sample that you are studying with a microscope, being able to hold it in your hand, examine it and show it to students or colleagues, opens up new perspectives and better understanding of complex micro-systems.
Another interesting use of 3D printing is the fabrication of micrometer-scale devices for the medical and electronic sectors.
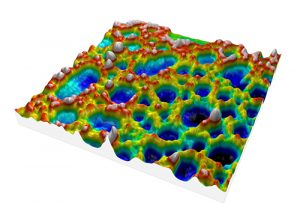
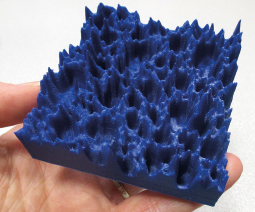
Above: Ink deposit measured using an atomic force microscope (AFM): from 3D view in Mountains® to 3D printed model.
Improved export for 3D printing
Up until now, users of Mountains® and MountainsMap® software products could already export 3D models of their microscopy and profiler datasets in STL, VRML and X3D formats for 3D printing.
However, new 3D printing file formats have become increasingly popular in recent times. In particular the 3MF format has the advantage of allowing users to manage color and/or texture, something not possible with STL. This file format is set to become a new standard in 3D printing.
With the new 7.4 release of Mountains®, exporting 3D models in 3MF for direct 3D printing is now possible. Let’s take a look at the new options available.
Print a Mountains® 3D model in 4 easy steps
1- Go to the File menu and save your surface
![]()
2- Choose to save as a 3MF file
![]()
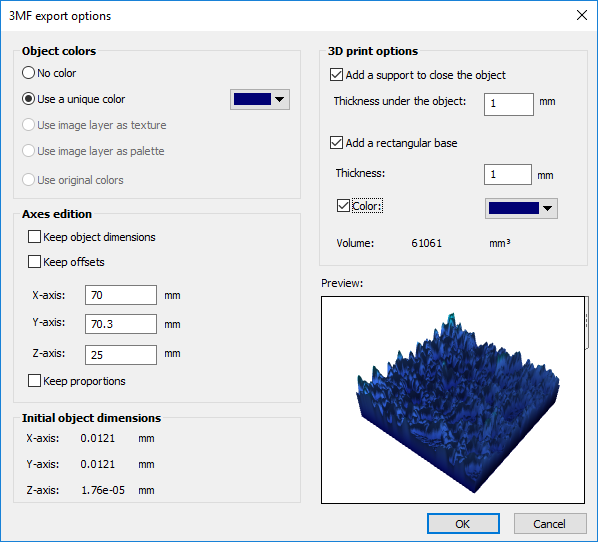
3- Choose export options:
* apply a color or use colors contained in an image file (if available)
* edit axes (choose scale factors for X, Y and/or Z)
* select options for 3D printing (close the object, add a base etc.)
4- Your sample is ready for printing (no post-processing required)!
You may also be interested in:
3D printing contest, the winning samples chosen by you